Software :: Hardware :: Network/Basic
Network/Advanced :: Security and Users :: System :: Misc ::
Security and Users
 Edit and create groups is just one face of a multi-faceted module in YaST2. The left-uppermost option in Security and Users is Create a new group, which is a sub-function of the User and Group Administration module, so we'll skip that, and work with Edit and Create...
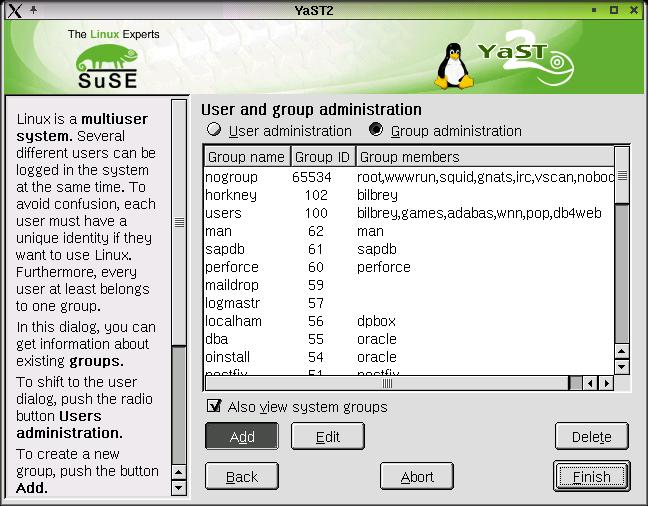
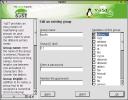 When invoked from the Edit and create groups icon, the module opens as shown at left, with the Group Administration bullet selected near the top of the dialog. I generally check the Also view system groups box below the group pane, so that I can see the entire field that I'm working in, rather than just the user/application space above GID (Group ID) 99. Bear in mind that the system only uses the numbers for its work and permissions. The correlation between numbers and names is simply for our benefit.
At right, the Edit an existing group dialog exhibits an interface identical to that of Add a new group, with the exception that in the latter case, the group name isn't already filled in, and the GID is auto-filled in by selecting the lowest available number over 100. That number can be edited, but the tool doesn't allow you to overload an existing GID or group name. Also, although it's a feature offered far more often than used, a group password may be set. The lower numbered groups are usually priviledged in one sense or another, and are usually automatically configured and/or removed when the package that requires it is installed or deleted with RPM. Don't delete blithely delete groups - you can break the functioning of your Linux system.
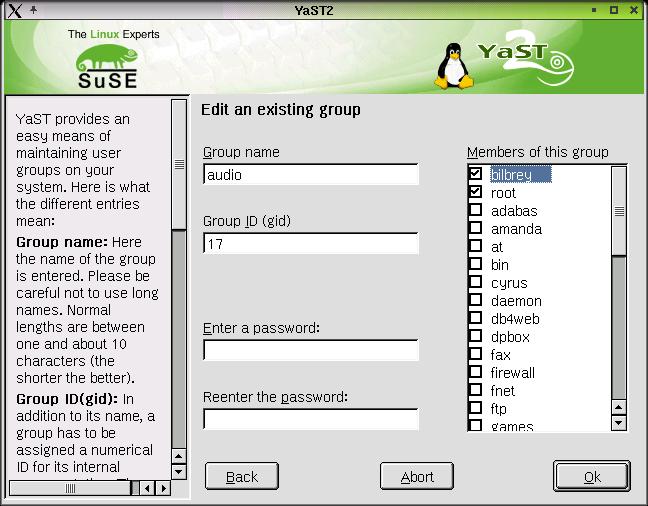
Primarily, an administrator creates groups to segregate areas of the filesystem, and give various permissions to one or more users through attaching them to the groups. In a single user system, the most common reason to be in the groups editor is to add new users to those that are permitted access to existing resources gated by groups. Let me give you an example. /dev/dsp is a device file which is used to access the audio hardware. The device is "owned" by root, and is of group audio. If I add a new user to the system, Marcia for example, then I want to head into the group editor and add Marcia to the list of users that are members of the audio group. Then when she want's to listen to music, the audio works - no permission problem. Note: LOTS of devices are protected in this way. For instance, if you have 5 remote users on your machine, you don't give them access to the cdburner or the audio hardware. In the first case, what's the point, as they can't put a disc in (they're remote, remember?). In the second case, do you want to have your speakers putting out what someone not in the room wants to hear? I thought not. Heh.
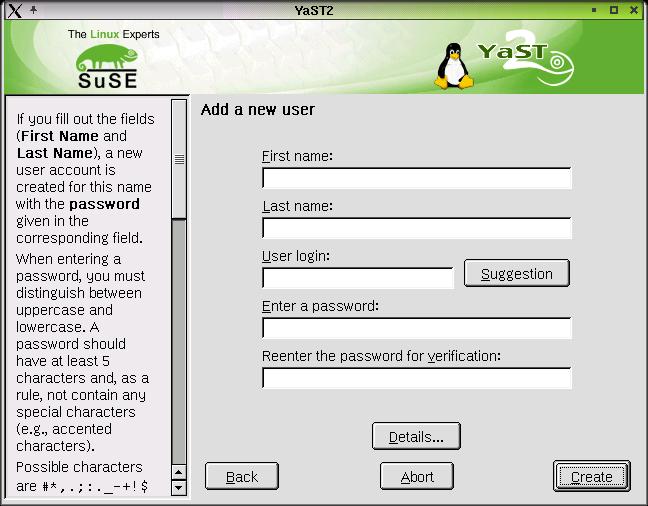
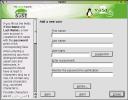 Edit and create users is the other face of the tool just discussed. At left you can see the Add a new user dialog. After entering the first and last names, then select an account name (I use my last name fairly often, as there are more Brians in the world than Bilbreys, but it's your call. Also account names should always be in lower case, or so I've heard.)
User accounts are automatically numbered. Under SuSE 7.3, the numbering starts with the lowest available over 500. In addition, unlike some other distributions, all users are made members of the group users by default (although that, too, can be changed). The main alternative you'll see with other Linux installations is that a new user account also generates a new group, of the same name. 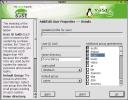 The common group indicates that SuSE encourages easy sharing of user data through appropriate use of setting the group permissions for files and directories.
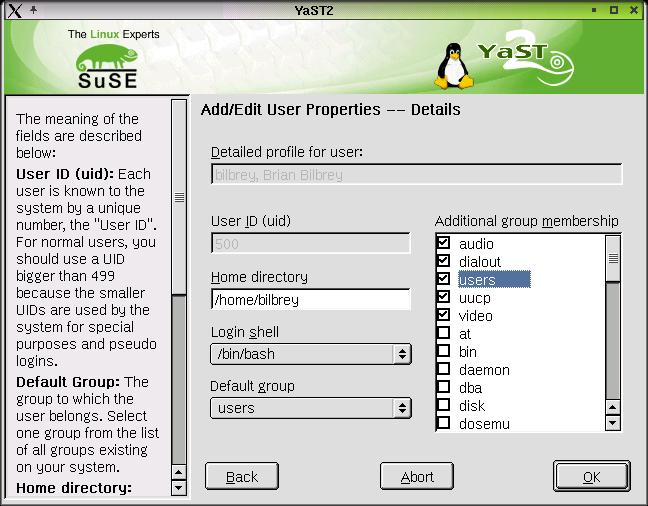
At right you can see the Add/Edit User Properties -- Details sub-dialog. In this context, the account name, user name and the UID are locked - not editable. However, it's possible to set here the Home directory, login shell, default group, and all the group memberships for a user. Here's another place where you can add a new user to, for example, the audio group (as in our example a few paragraphs previously). Note that, like services, you shouldn't create login accounts that you aren't actively using. An untended and unused account with an unchanging (and possibly weak) password can be an open invitation for someone to hack into your box and thus into your network. One other IMPORTANT caution. SuSE hasn't incorporated any preliminary password checking - I'm accustomed to making good passwords to start with, but several distros remind you that dictionary words are a no-no, and that it's a good idea to incorporate both punctuation and numbers into a password to make them MUCH stronger. No such warning from SuSE, sad to say. Ah, well, you can't have everything.
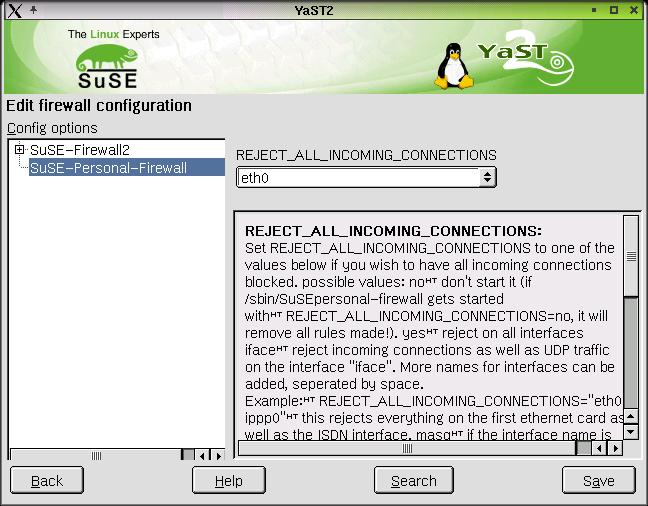
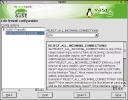 The Firewall Configuration module offers selection between two distinct types of protection. The lesser is called SuSE-Personal-Firewall. I use the word lesser only in the sense that there's very little user interaction to create the firewall. You can see the whole of it in the dialog shot to the left. The values that can be entered in the empty list box are yes, no, a specified interface (like eth0 or ippp1) and if the latter, then masq can also be appended (like eth0 masq). Not exactly pellucid, but it can be puzzled out. Here's a good idea: Open up the firewall tool and set Personal Firewall to yes. Now everything's blocked while you decide what to do next. Here's what a default on installation SuSE box looks like in terms of blocking incoming connections:
gerlling:/home/bilbrey # iptables -L
Chain INPUT (policy ACCEPT)
target     prot opt source               destination

Chain FORWARD (policy ACCEPT)
target     prot opt source               destination

Chain OUTPUT (policy ACCEPT)
target     prot opt source               destination
Note that by default, nothing's blocked. This DOESN'T mean that you're vulnerable on services you aren't running. Said another way, you are only a target on those ports where you have running services. At this step in the writing, I've got about 10 ports open, from ssh to SunRPC, as well as several services from the other testing. The point of the firewall is that probes will never even get to services that you don't explicitly make available by running them, AND opening a hole in the firewall. Belt and suspenders, it's a feature as opposed to a bug. Once I set the blocking to yes, here's what the iptables listing looks like:
gerlling:/home/bilbrey # iptables -L
Chain INPUT (policy ACCEPT)
target     prot opt source               destination
devchain   all  --  anywhere             anywhere

Chain FORWARD (policy ACCEPT)
target     prot opt source               destination

Chain OUTPUT (policy ACCEPT)
target     prot opt source               destination

Chain devchain (1 references)
target     prot opt source               destination
rulchain   all  --  anywhere             anywhere

Chain maschain (0 references)
target     prot opt source               destination

Chain rulchain (1 references)
target     prot opt source               destination
DROP       udp  --  anywhere             anywhere           udp dpt:sunrpc
DROP       udp  --  anywhere             anywhere           udp dpt:604
ACCEPT     udp  --  mail.orbdesigns.com  anywhere           udp spt:domain
DROP       icmp --  anywhere             anywhere           icmp redirect
DROP       udp  --  anywhere             anywhere
LOG        tcp  --  anywhere             anywhere           \
		tcp flags:SYN,RST,ACK/SYN LOG level warning
REJECT     tcp  --  anywhere             anywhere           \
		tcp flags:SYN,RST,ACK/SYN reject-with tcp-reset
Note that now the rules are setup to block (by DROPing or REJECTing) almost everything, except commo from my nameserver, on port 53 (domain), via UDP. Nothing else gets in. Nothing. That's good. Now selective openings can be made, if you desire. Follow the directions for setting up masquerading (a form of NAT, aka Network Address Translation, aka Connection Sharing) in the configuration or network books that come with the retail version of SuSE.
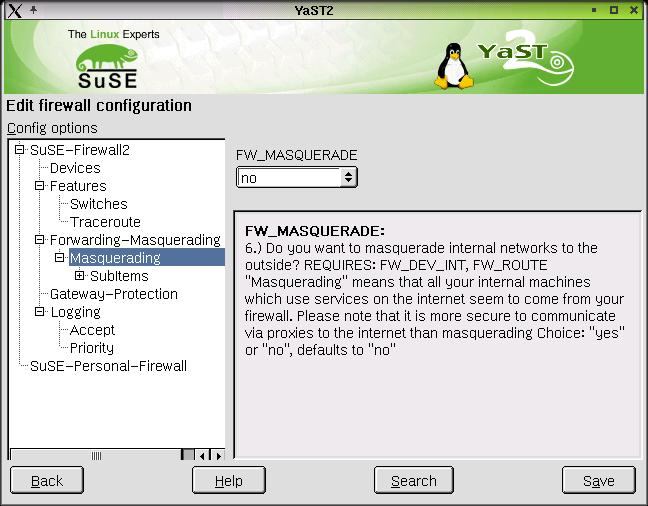
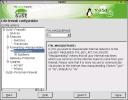 At right you can see the assortment of much more detailed configuration options that are available by setting up the firewall via SuSE-Firewall2. This permits much more fine-grained control over the setup of the IPtables rules that are invoked to protect your system. Fundamentally, this is only necessary if you are providing services to the internet, in which case you need to learn more about IPtables than I am going to present here. For personal or home network use, no mail or web server or whatever, the Personal-Firewall settings are more than sufficient to meet your needs. But DO use them. Don't trust yourself not to configure a dangerous or vulnerable service. Practice safe computing.
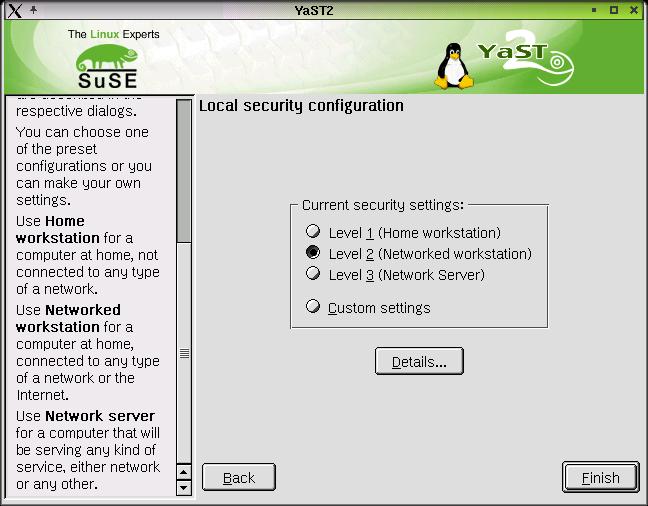
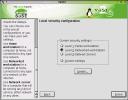 In theSecurity settings module, we can fix a couple of my gripes from the create new users section (above). But first, the dialog comes up with Custom selected, and the Details button unavailable... What's up with that? Well, it turns out that you should start off from one of a basic set of configurations, then step through and customize it. Personally, I'd like Details to be available from Custom, so that I can see what I actually already have setup. Ah, well. My preference for setting up is to start with Networked workstation. Why both with a secure and stable OS like Linux, if you plan on dumbing down the security for "home" use. Homes are tough, insecure environments, often with data that's MUCH more important to you than corporate data. Think financial information, credit card data, etc, etc. Protect your box. So I select Level 2, then click on Details to start customizing it to my liking.
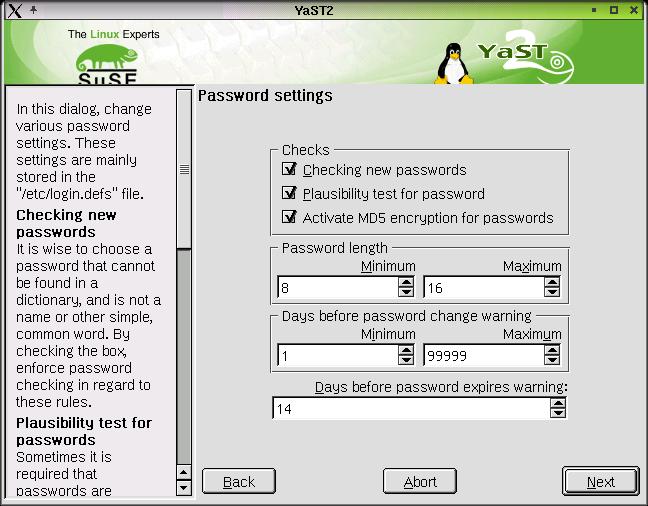
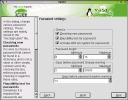 Now, in the first dialog, we can fix the bits about password setting that I liked so little. I select all the available options - these two checks in combination with MD5 hashes (where the md5sum program is used instead of the less robust crypt utility) make for MUCH better passwords. Also, I like increasing the minimum password size to 8, and bumping the max up to 16 (from defaults of 5 and 8, respectively). Again, more bits == more security. The rest of the settings I leave as default.
Clicking on the Next button, I am presented with boot settings. Here I can set what the behaviour is for CTL-ALT-DEL (aka the Three Finger Salute). Really, this isn't necessary in a Linux system, so I leave it at Ignore (the default). The other setting is for which users have access to shutting down the system from the KDM graphical login manager. I say, root user only.
Next again, to get to the login settings dialog, where I can modify an important number: The delay, in seconds, following a failed login attempt. The longer the delay, the more annoying it is for a regular user (like you and me). However, the longer the delay, the harder it is for some unauthorized party to brute force your login name and password, one try at a time. Strike a balance that works for you. That field is complemented by checkboxes enabling (or uncheck to disable) logging of successful and failed login attempts. I like logs. Check both. You'll be happy to have lots of logs, if you ever get hacked.
In the Users and Groups management tools, we talked about minimum ID numbers that are assigned to new entries. In this next settings dialog, the minimum number can be configured, as well as the maximum, for each type.
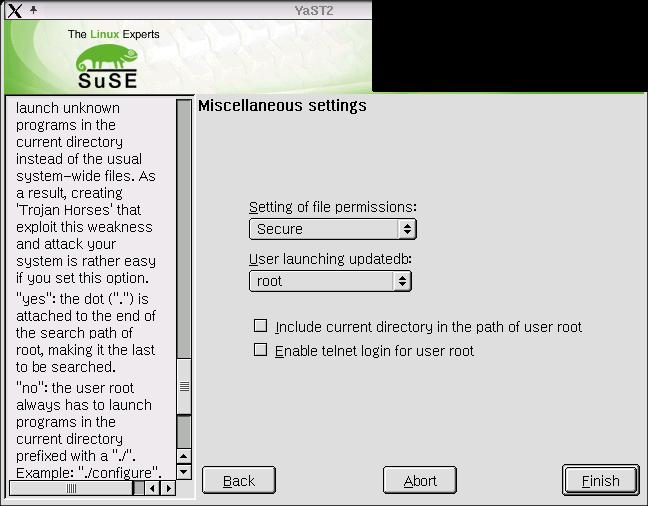
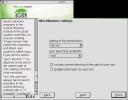 Security settings winds up with a dialog called Miscellaneous settings. There are four items here to configure. The first is Setting of file permissions: easy, secure and paranoid are the options. Paranoid requires a lot of work configuring even X and applications to run on a per/user basis. Perhaps useful in a hostile network (or again, a house with kids). Easy makes almost everything readable by all users. I'll take the middle road. The User launching updatedb option permits selecting either nobody or root. By using nobody, only places in the directory heirarchy where user nobody has permission are files cataloged into the locate database. If updatedb is run as root, then the whole filesystem is logged into the database. I find that the former only secures the box against stupid attackers, and if they already have shell access, you've got trouble anyway. I make use of locate too much to consider having bits non-findable with that tool. I choose root. Finally, there are checkboxes for including the current directory in the executable path of the root user (BAD idea) and whether or not to enable telnet logins for the root user (another BAD idea).
Once everything's been setup to your satisfaction, click on finish. Note (as I observed previously) that all of these settings are NOT able to be accessed again - if you want to change one item, you'll have to reconfigure all the settings. So take notes, at least you won't have to think about your answers the second and third time through.
Software :: Hardware :: Network/Basic
Network/Advanced :: Security and Users :: System :: Misc ::
All Content Copyright © 1999-2001 Brian P. Bilbrey.


 This, like all the other ODTL reports, is a purely personal and subjective report of my experiences with the software and/or hardware in question. If you try this at home, your results may match mine exactly. Alternatively, following these steps might make the neighbor boy start sleeping with sheep, cause your toaster oven to become Internet-connected, (then be hacked by some kid in Pasadena who lights your house on fire with it), and finally, may turn your low fat milk sour and chunky just as you raise the carton to your lips. YMMV, Caution Advised.